
Understanding Subscription Types
Our cloud platform offers flexible subscription models tailored to different business needs. The primary options include:
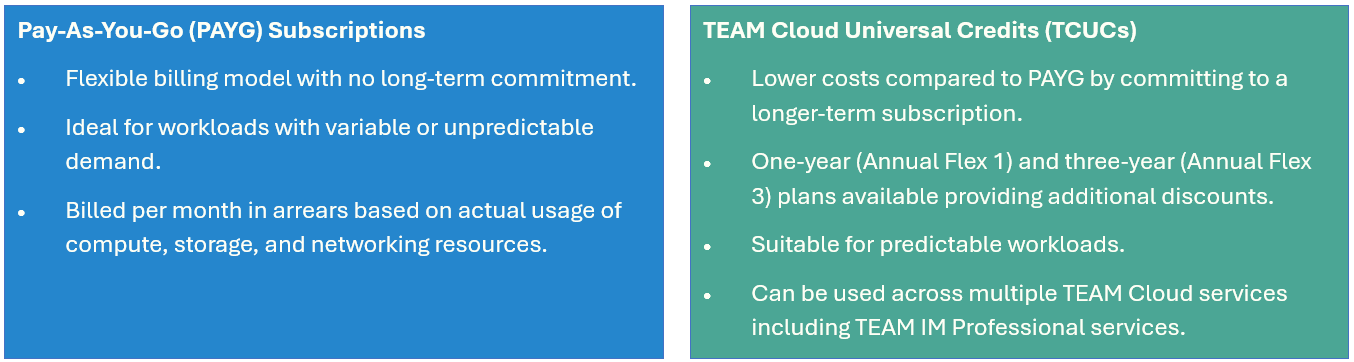
When you sign up for a TEAM Cloud Account, you have unlimited access to all eligible IaaS and PaaS services and can start using them at any time.
NOTE: Your Home Region is the region where you first activated your tenancy. In order to consume services from another region, you must subscribe to that region from within the Home Region Console.
Contact support or your Account Manager for any subscription adjustments.
Viewing Billing Details
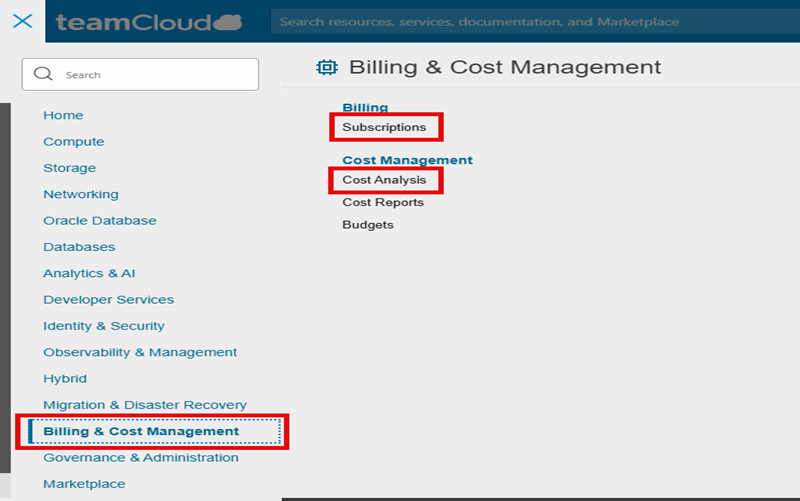
Navigate to the Billing & Cost Management link and select the Cost analysis and Subscription pages to see a snapshot of the subscription's billing and usage. View the subscription ID, total credits amount and check the remaining balance. The pages can differ, however, depending on the pricing model being used - that is, whether you have TEAM Cloud Universal Credits (TCUC) or Pay As You Go.
Under the Subscriptions link, select UCM where you can view:
- The credits used against the total. Your remaining balance is the left amount.
- The number of days that have elapsed in the commitment.
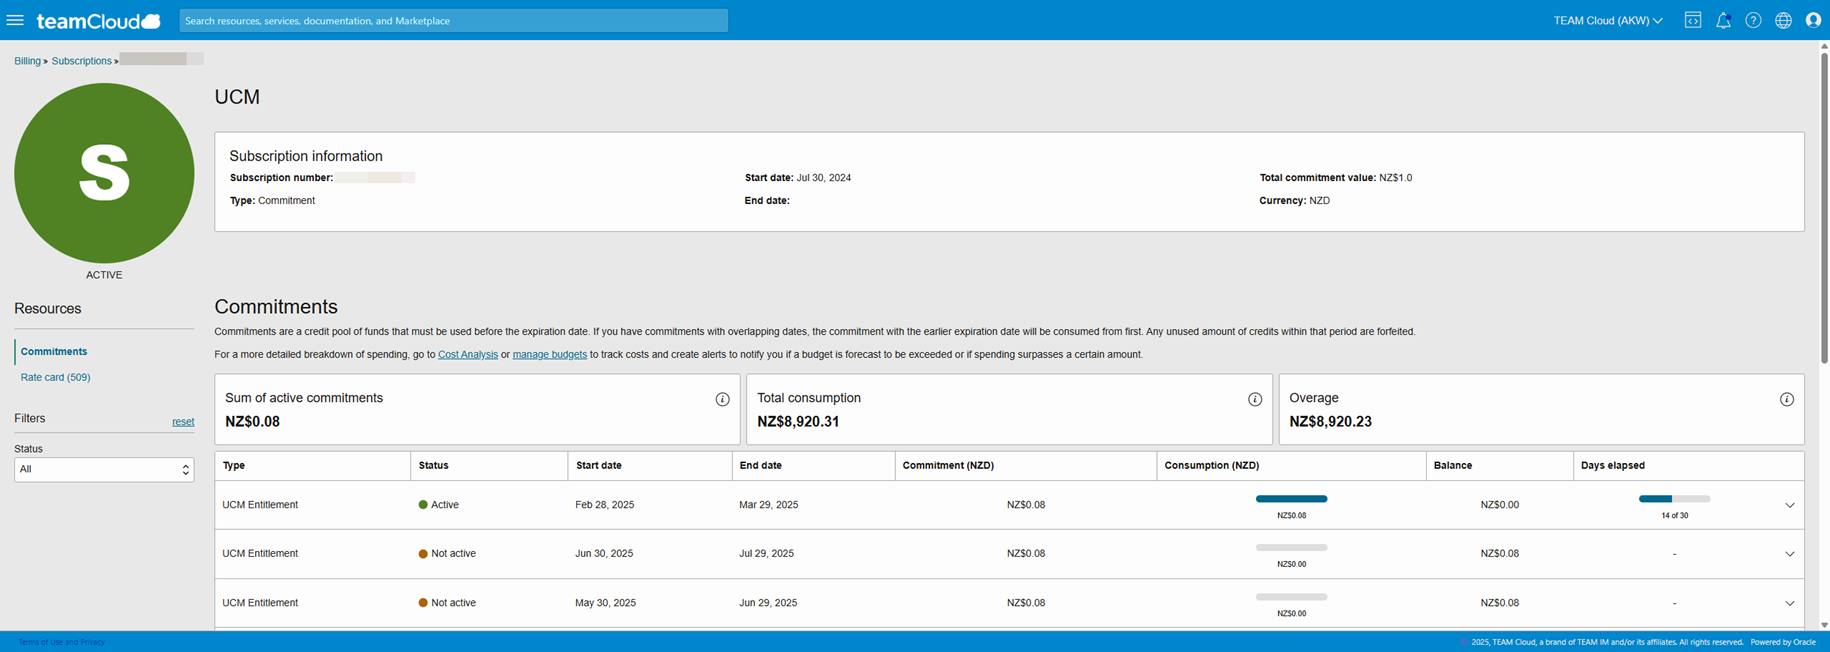
Billing and usage information can differ whether you're signed in as a parent or child tenancy in an organization:
Parent tenancies can see the commitment details for themselves and all child tenancies in the organization that are sharing a subscription. For such a case, you can view the credit usage and days elapsed, for both the parent and child tenancies. As a result, the parent tenancy can get an overall view of all the usage at the commitment level across the entire organization, for every commitment in each subscription.
When a child tenancy is signed in, the child tenancy can only see its own commitment details.
To view more detailed cost reporting information, select Cost analysis.
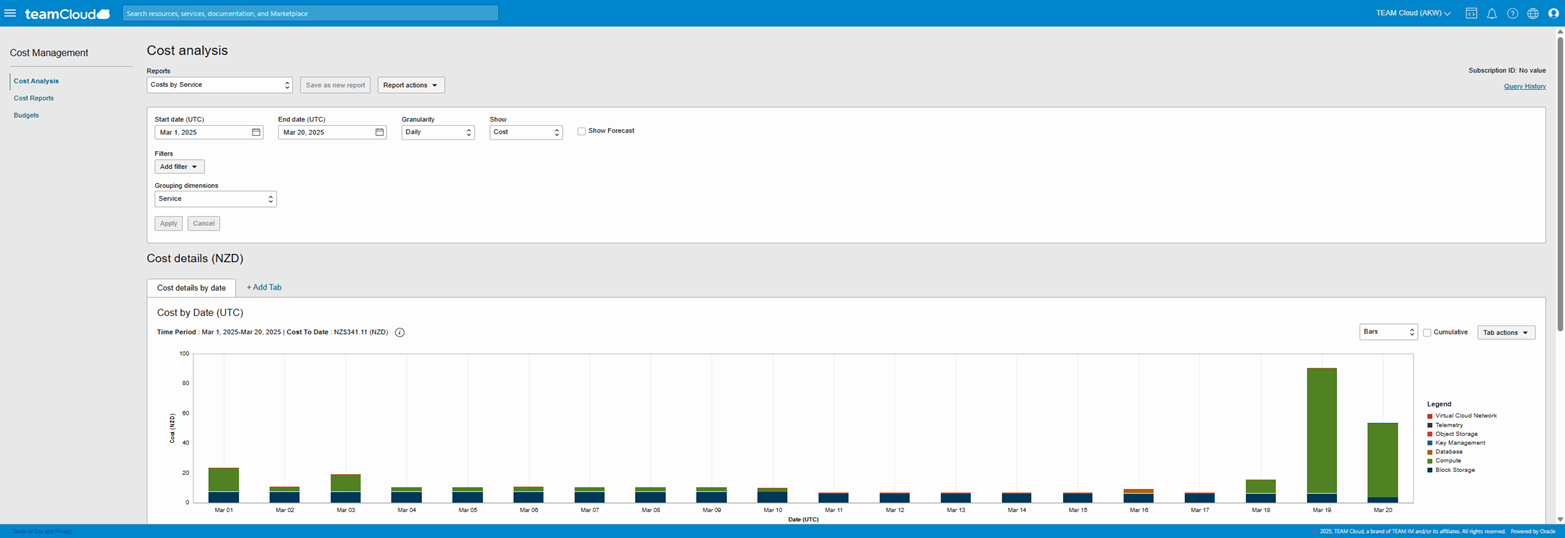
Navigate to the Cost analysis page to generate charts, and download accurate, reliable tabular reports of aggregated cost data on your TEAM Cloud consumption.
Common scenarios you might be interested in include:
- Viewing monthly costs for compartment X and its children, grouped by service or by tag.
- Viewing daily costs for tag key A and tag key B, values X, Y and Z, grouped by service and product description (SKU).
- Viewing hourly costs for service = compute or database, grouped by compartment name.
You can choose from one of the predefined, default reports from the Reports menu, and you can choose the dates you're interested in. By default, the Costs by Service report is shown when the Cost Analysis page first opens. Use the Filters menu to filter by the specific tags, compartments, services, or other filter you want, and pick how you want it grouped using the Grouping dimensions menu.
Creating a budget
A budget is an option provided in the console by which you can track TEAM Cloud spending. The feature enables you to set soft limits on infrastructure spending and create alerts to keep a check on the budget spend. For instance, if the expenditure crosses the set threshold, then you will be notified about the additional spend by email.
Open the navigation menu and select Billing & Cost Management.
Under Cost Management, select Budgets
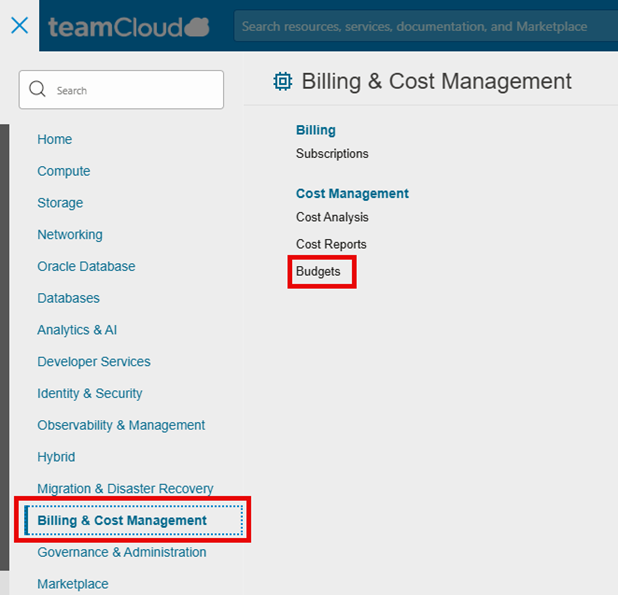
On the Budgets page, click Create Budget.
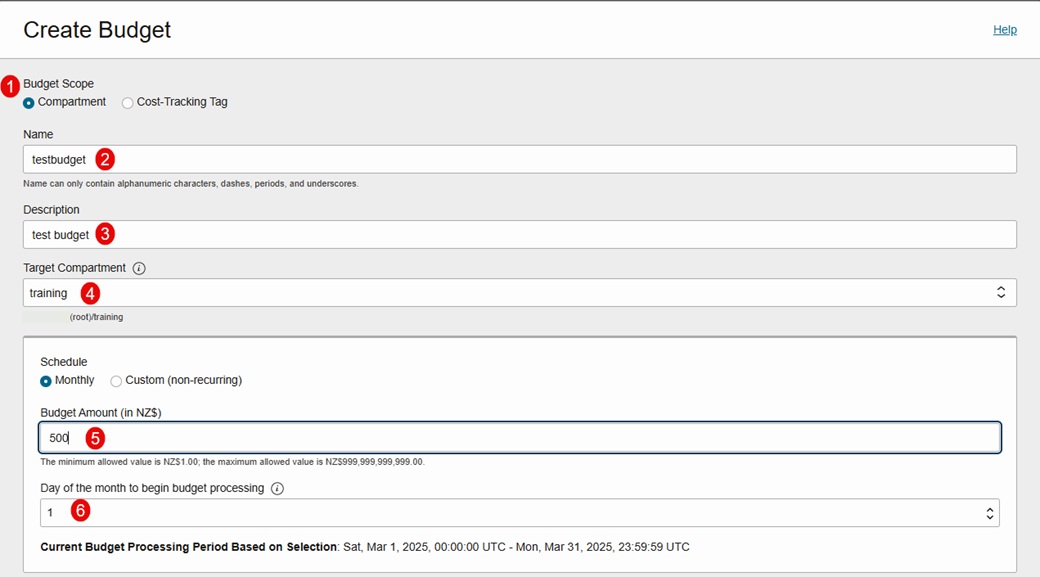
Budget Scope: select the type of target for the budget:
Compartment: If you want to track spending for all resources in a specific compartment.
Cost-Tracking Tag: Tracks spending for all resources with a specific tag. These might be spread across multiple compartments.
Name of the Budget as per your standard. The name can contain only alphanumeric characters, dashes, and the underscore character, and can't begin with a number. Avoid entering confidential information.
Enter a description for the budget. Avoid entering confidential information.
Select the target for the budget
Under Schedule, select either Monthly for a recurring budget, or Custom (non-recurring) for a budget that's used only a single time.
(Monthly) In the Budget Amount field, enter a monthly amount for the budget.
(Custom) In the Budget Amount field, enter an amount for the budget.
(Monthly) From Day of the month to begin budget processing, select the day of the month that you want budget processing to periodically begin on each month.
Setting this value allows you to create a budget that aligns with your billing cycle date, and to receive more meaningful budget alerts.
Creating a budget alert rule
You can optionally create an alert for the budget by creating an alert rule now or add it later. You can set up multiple alerts for the same budget.
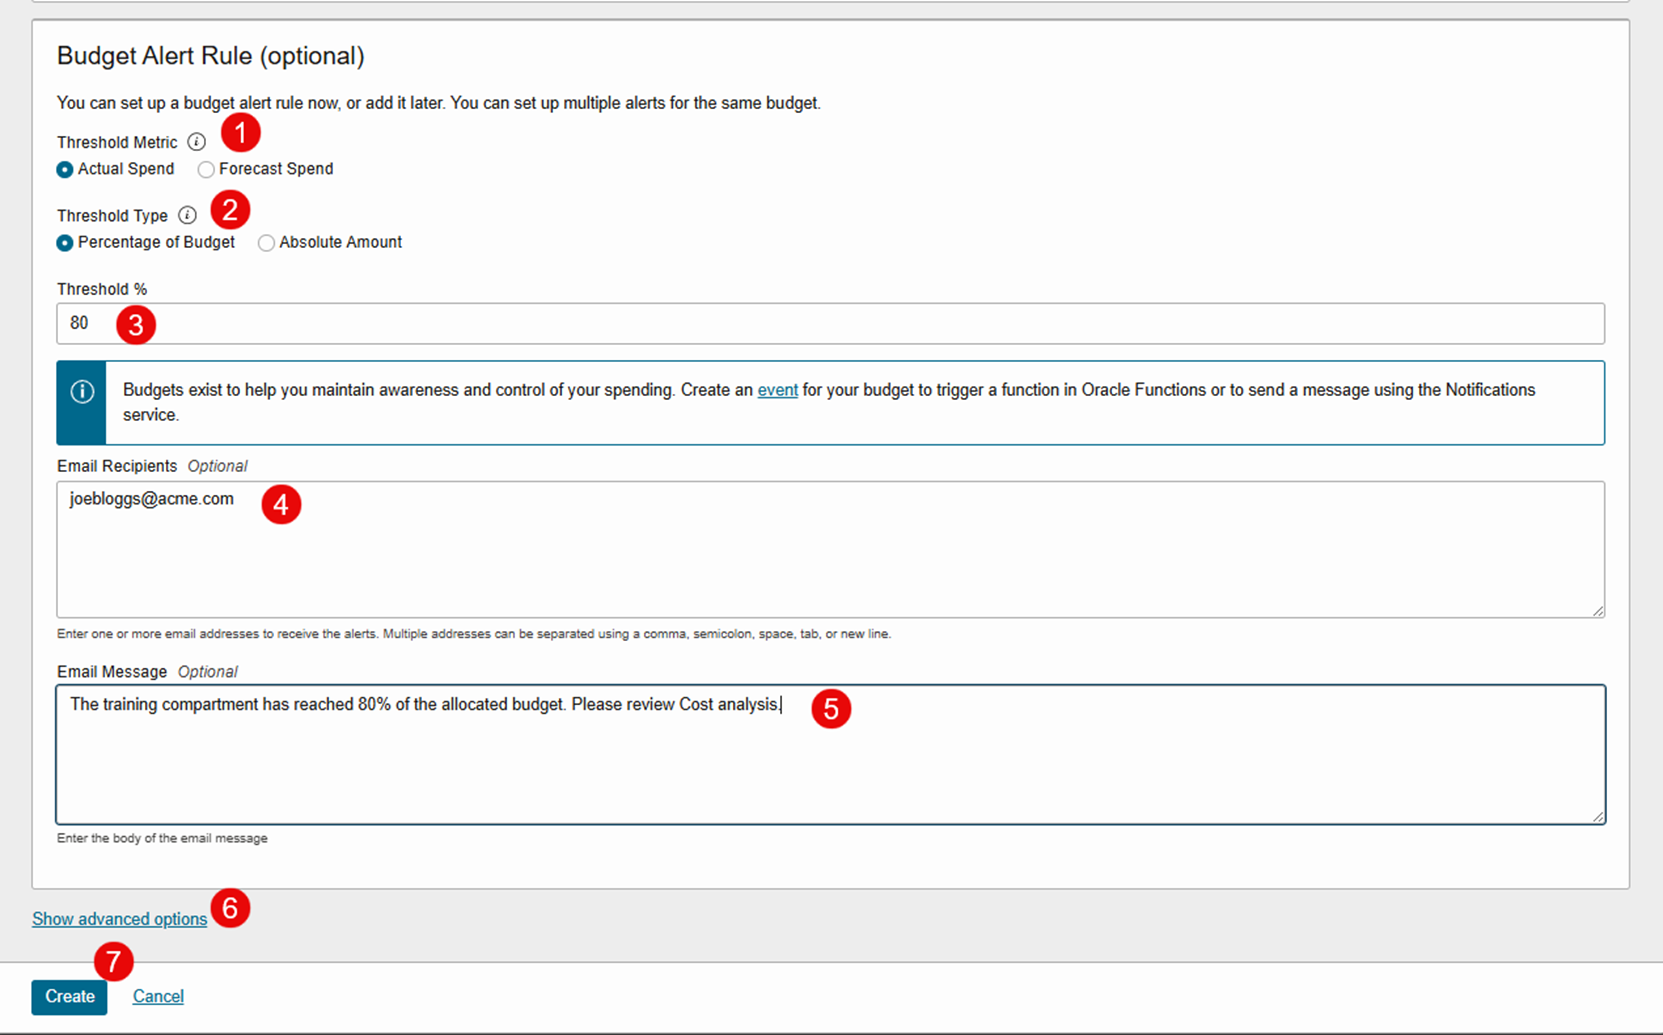
For Threshold Metric, select a threshold for the alert:
Actual Spend watches the actual amount you spent in the compartment per month.
Forecast Spend watches resource usage and alerts you when it appears that the budget will be exceeded.
Select an option for Threshold Type:
Percentage of Budget: A percentage of the monthly budget, which must be greater than 0 but no greater than 10,000.
Absolute Amount: A fixed amount.
Enter a value for either Threshold % or Threshold Amount.
Optionally, in the Email Recipients field, enter one or more email addresses to receive the alerts. Separate multiple addresses by using a comma, semicolon, space, tab, or new line.
Enter the body of the email alert in the Email Message field. The text of the email message can't exceed 1,000 characters.
Click the Show advanced options link to assign tags to the budget.
Click create